September 02, 2011

How To Introduce Your Brand New Smartboard

Here she is, implementing New Technology with sagacity and charm
Our entire school got new SMARTboards this year. Every classroom, every teacher, whether they wanted one or not. We didn't exactly do this on purpose. I'm a big believer in letting the teacher decide how and what will be their best use of technology, but our parents got really excited about this one. And when parents get this excited about spending money on their kiddos...you just nod your head and say, "Rock on Bro!"

So there it is...all shiny and white and new...
 And the kids are gonna be Soooo excited!

Now if you could just figure out what to do with it.
Here are a couple of ideas that may give you a jumpstart.
There are a bunch of great "Back To School" Notebooks on the Smart Exchange website. Here are a couple I recommend:
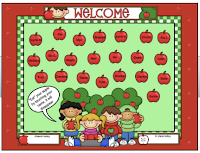


Simple Attendance Taker for K-2

For the younger kiddos (about K-2)
This is one page of pure learning simplicity. You just change the names on the apples to your kid's names. The kids touch their apple and it disappears (with a cute little chewing sound). This way they all get to touch the board the first day (that matters if you're them! :))


Back To School Activities for K-2
Back To School Activities for 3-5
I like these next two, because they're longer and give a great overview of a bunch of SMARTboard functions.

Engaging.

Also, the teacher notes (little pull downs on the top left) for each page are really well done.

Just click the links, download them and start playing around. You don't have to be plugged into the board in order to get yourself oriented to the software and you can't hurt anything. No matter what you do on this first week back, if you let them touch the SMARTboard, you'll for sure be the uncontested, most awesome teacher ever.

I'm just sayin...

DOWNLOAD  Software Now
Also, If you haven't downloaded the SMART Notebook software, here is the post about how to do that. (Highland: I'll email the code out as soon as I get access to my email account, but you can download and get started without the code and add it in later)

September 01, 2011

Why I Keep Playing With Kindergartners

Photo Credit: Jessica Miller
On the first day of my first year as a Kindergarten EA, I was sent outside with the class while the teacher finished prepping for the rest of that long day. I was wearing my long white flowy skirt (I know...white and Kinders...*shrug *) and holding hands with two little girls.

"Hey you guys! Let's play Duck, Duck, Goose," I said, and the kids cheered.
Then a tiny hand tugged at mine and when I looked down, two blue eyes were gazing up at me. "We should play Duck, Duck, Swan, and you could be the swan," she said, very seriously.

I haven't needed to question my decision to go into education since that day.

It's been a long year. No, it's been a really long 6 years. I guess I'm a grown-up now, because broken friendships and mean people have finally left their mark and I'm more cynical and jaded than I ever really wanted to be. I was agonizing about this to my dear Best the other day.

"I'm a freak," I said, "why have so many people treated me this way? How do people just walk away from people they seemed to care about and never look back?" My Best is wise (which is why I married him of course).

"You're not the only one. Everyone has the kind of broken friendships that hurt and will never make sense to them. That's just human. You're not a freak. You're just acquainted with the real world now."

Both things are true. I am more cynical than I ever wanted to be, because a lot of people are meaner and more selfish than they really need to be. Bleh.  And, it's true that I'm not the only one who has been on the crummy end of selfish decisions. People everywhere know what this feels like. But I don't want to live jaded. I'm determined to live into beautiful, into kindness, into selflessness. And that's why I keep hanging out with Kindergartners.

They tell me I'm pretty. They ask me if I could teach them how to do something. They want me to swing with them. They listen if I have a story to tell. They want me to like what they like and not just because it would give them a higher number on their Facebook friends list.

Kinders are the real deal, my friends. These are the people I aspire to be like.
School starts in 5 days. Today I signed up to do the Kindergarten Tours where I show them where the bathroom is and introduce them to the nice office lady who has the band-aids.

I.Can't.Wait!

May 11, 2011

4 Things To Make Life 4 Million Times Easier!


I. Make yourself a Google Account!
so that you can
  • A. Make an iGoogle Page (This is a lifesaver when you find yourself on someone else's computer because yours got left home or it got in trouble and had to go see Roy)
  • B. Use Google Docs (Why use Google Docs sometimes? Collaboration. Cross Platform. Available anywhere. Fill-able Forms.)
  • C. Take a Look at Google Calendar (I have 12 different calendars all stored in the same place, all color-coded. The Husb and I can access them from anywhere...even our phones. Saved my life SO many times!)
  • D. Consider a Blogger blog to put your class newsletter on. This is a super non-threatening way to delve into the techy-classroom stuff. Get your feet wet with a simple Blog style newsletter instead of an email one. It will be on the web, but you can make it so it's not searchable...only people with the link can get to it, so that's cool. Don't wait until you have time to make the perfect class website. You can literally have a cute blog up in 5 minutes and down in less than that if you change your mind. It's totally worth trying!


II. Magical Mac Tricks You May Not Know.
  • Touch Pad Finger Zoom and Right Click trick
  • Keyboard Short Cuts. CMD-X,C,V,A,Z. Know them, Love them. Do you have others to add to our vast storehouse of treasures?
  • Screen Capture. CMD-Shift-3: Captures the whole screen and saves it to the desktop. CMD-Shift-4: Gives you a little crosshair cursor. Drag it around what you want to capture and it will snap a picture of that and save it to the desktop.
  • Magnifying Glass Search in the Upper Right Corner. Did you know this was there? Use this to open applications and documents. So Awesome!
  • Hot Corners. They can be annoying or really awesome, depending on how you like to work. I set the bottom right corner to show my desktop...it sort of mimics a PC tool I used to love!


III. Awesome App Tricks You May Not Know!
  • Sticky Notes are SO cool. Type in Stickies in the Search bar up there. The application is self explanatory, but if you want it to open every time you turn your computer on, click and hold the icon in the dock until you see Options pop up. Choose to Open at Login.
  • First Class is your default mail, but it's probably not set up to be the default when you're browsing the web. Irritating! That's ok, here are the instructions about how to set it up so that whenever you click on an email link from a website, FirstClass will open instead of MacMail. Click Here to Download the Instructions. Here is an email link to use so you can see if it's working.
  • Here's another FirstClass trick to make life easier. Save your name on the login screen so you only have to type your password. Here, I'll post a picture of what I'm talking about.
  • Make folders in your FirstClass to help organize your emails. Click on your inbox (or whatever folder you want to put your new folder inside of) Then go to File>New>New Folder. Now you can drag emails into folders.
IV. Web Browser Organization!
I recommend using Firefox as your Web Browser. It just plays nicer. But even in Safari, there are a few good tricks to know.


If you're in Safari:

1. First, Show the Tab Bar. Go to the View Menu and click Show Tab Bar. Phwew. Now you can keep track of where you are when you're surfing.
2. Now Get a Home Button. Go to View and Customize Toolbar. Drag the little house button onto the top toolbar. Phwew. Now we have a home key. Everyone needs a home that's easy to get to.

Now for either Safari or Firefox:

  1. Set iGoogle as your Home Page: Open up your iGoogle Page. On the Menu, go to Firefox(or Safari) >Preferences>General. Under the Homepage Bar click the button that says Use Current Page.
  2. Set your browser to open a new tab instead of a new window: Go To FireFox(or Safari)>Preferences>Tabs>Open Windows in a New Tab
  3. Remove anything from your Bookmark bar that you don't use: In Safari you just drag that baby off there and Poof! In Firefox you can Right Click and choose Delete.
  4. Make yourself some Folders up there: Right Click on an empty space on the bar. Safari gives you one option. Firefox gives you a bunch.
  5. Now Surf and find something you want to Bookmark. In order to save it...just do this: See the cute little picture in front of your address bar at the very top? Drag that into a folder you just made on the Bookmark bar. Link saved. You love this, don't you? You can also go into the bookmarks menus and get more specific with your organizing if you like, but this is the easiest way to deal.

May 10, 2011

YouTube In Your Classroom

YouTube is awesome.
And frightening.
But Awesome.
There are so many good, good educational things right there at our fingertips, but there are all those ads and crazy people are allowed to upload things as often as nice, smart people are...so...it can be scary to use it in your classroom. I totally get that.
There is a solution.
You can download the clips you want to use right onto your desktop. They come down without the ads and you don't have to be connected to YouTube at all to view it, so this also solves any internet connection issues you might have during the day.
Definitely preview what you're going to show, because the crazy's are out there and they post crazy stuff, but this little ClipNabber trick puts the safe and Awesome back into YouTube for you!

Here's the link. You won't need to download anything if you use this link.


How does it work:

  • 1. Find the video you want to download from YouTube.
  • 2. Copy and paste video URL at Clipnabber.com
  • 2. Click on “Nab” button.
  • 3. It will bring in the video and give you options of FLV (Low), (Med), or (High) (sometimes you'll only get one option). Choose one.
  • 4. In the Dialog box you can choose save and it will go to your Downloads folder (or wherever your downloads default to)
  • Save it on your desktop or in a folder where you want to keep it and play it by double clicking on it. (It comes in small. Use the bottom right corner to enlarge it.)

Also...Don't forget that you all have a Discovery Streaming Subscription. These ones are safe. PURE education, and also downloadable.
If you don't know your login information and how to use it, let me know. I'll be happy to help!

Happy Watching!

April 08, 2011

Smart Board Tutorials

I did some poking around on the SMART Website, and... shoot! There's a lot of stuff there.
Overwhelming!
But I did the work for you and pulled out the gems. If you're anxious to learn to use the SMART boards, I think you'll want this.
  • First: Take a look at this 4 minute video. It'll totally inspire you and maybe teach you a couple of things in a really painless way!

  • Next: Here are some online tutorials. They are basic and not entertaining, but they get you the information you need to start feeling comfortable with the Boards and you can do it in front of your fireplace if you want (that's always a big deal for me...Central Oregon spring...you know).
(PS. A word to the wise...Don't bother with what is called the SMART Learning Space. Bleh! Unless you're in the mood to poke your eyes out with blunt objects. Go with these little videos instead to get a hold of the basics! They're only 3-6 minutes each, so that's awesome!)

1. Finding What you Need(4:01)
2. The Ink Layer(2:55)
3. The Lesson Activity Toolkit(5:40) (Ahha! This one's totally helpful. This will get you started creating cool whiteboard lessons. And it's only 6 minutes long, so...Yay!
4. Managing Pages (2:55) (You'll want to understand this when you start getting the hang of creating lessons. This is necessary for organizing them.)
5. Properties Tab & Page Recording (3:40)(more advanced stuff here)
6. New Tools in Notebook 10 (5:59)(Skip the first 2 minutes of this...it's a tool we don't have at this point. The rest is good info though.
  • Finally: Here's an awesome tool. Print out this little document and it walks you through the creation of an interactive lesson. A GREAT way to get the gist of the Smart Board tools.


Phwew! That took awhile, but they're good resources. I sure hope it helps some of you.
Happy SMART Boarding my friends!!
~Jen

FYI-Here is the webpage that I pulled all these off of. It was hard to find...so I'm saving it right HERE!
Related Posts Plugin for WordPress, Blogger...